Face Mask Recognition using Deep Learning
Face Mask Recognition using Deep Learning in COVID-19 Pandemic
Face Mask Recognition Application is very useful in this COVID-19 pandemic. One of the reasons behind the spreading of COVID-19 is, "People are not wearing Face Mask". So, this kind of application can be helpful to the Government as well as Industrial use. We can use Raspberry pi with a Deep Learning Face mask detection model and it will recognize the face of the person and detect the face mask. This type of system can be useful in the door entrance of the Office/Mall which regulates the facemask detection. If a person without a facemask is found, The system will run a "Beep" sound and alert him/her to wear a facemask to give entry. See the demonstration video below:-
Let's Predict FaceMask
1. Download the Dataset
You can download the dataset available on Kaggle's Website in which they have given separate classes of "With facemask" and "Without facemask" for face mask detection. you can go to my GitHub repository to download the model, code, and dataset.
2. Preprocess Dataset for prediction
I have used Keras library for deep learning. ImageDataGenerator available from Keras will preprocess the data. You can use rescale, horizontal flip, rotate of the image as well as some other parameters as per your requirement.
Code:-
#Importing image data generator for preprocessing
from keras.preprocessing.image import ImageDataGenerator
# Setting parameters of Image Data Generator for preprocessing
img_gen=ImageDataGenerator(rotation_range=30,width_shift_range=0.2,height_shift_range=0.2, shear_range=0.1,zoom_range=0.1,fill_mode='nearest',horizontal_flip=True,rescale=1/255)
#Selecting directory and Target size for image preprocessing
img_train_gen = img_gen.flow_from_directory('D:/Deep Learning Projects/Face Mask Dataset/Face-Mask-Detection-master/dataset',target_size=(256, 256),class_mode='binary',batch_size=32)
3. Model Generating
The process behind Deep Learning is as shown in the Block diagram:-
 |
| Figure 1. Model Training |
As you can see in this block diagram, first of all, we have to take a dataset with "With Face mask" and "Without Face mask" image file. so that, the trained model will bifurcate the image with/without the facemask of the captured image. To generate a facemask detection model you just have to preprocess your data then train the model to detect facemask.
The code for Model Making is as shown below or you can also go to my GitHub Repository to download the code.
Code:-
#Importing model and Layers for Deep Learning
from keras.models import Sequential
from keras.layers import Conv2D,MaxPooling2D,Flatten,Dense,Dropout
model = Sequential()
#Adding two Convolution-2D Layer and Maxpooling2D Layer
model.add(Conv2D(filters=32,kernel_size=(3,3),input_shape=(256,256,3),activation='relu'))
model.add(MaxPooling2D(pool_size=(2,2)))
model.add(Conv2D(filters=64,kernel_size=(3,3),input_shape=(256,256,3),activation='relu'))
model.add(MaxPooling2D(pool_size=(2,2)))
#Flattening the data
model.add(Flatten())
#Adding Dense and Dropout Layer
model.add(Dense(128,activation='relu'))
model.add(Dropout(0.5))
model.add(Dense(1,activation='sigmoid'))
#Compiling Model
model.compile(loss='binary_crossentropy',optimizer='adam',metrics=['accuracy'])
#Model Summary
model.summary()
#Training the model for image dataset
result = model.fit_generator(img_train_gen,epochs=5)
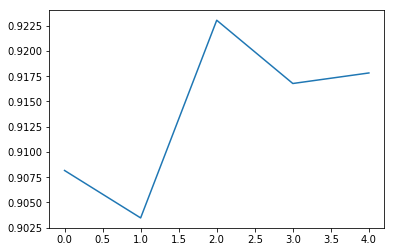
#Plotting the Accuracy Graph of Model
plt.plot(result.history['acc'])
[Hence, we can say that accuracy of the model is 91-92%]
#Saving model for realtime processing
model.save('FaceMask_epoch_Acc91.h5')
4. Use Trained Model for Real-World Application:
The trained model can not work directly to detect facemask. First of all, you have to detect the face then apply face image to the model which will predict the facemask. Here, I am using a haarcascade to detect the face, and then the window of the detected face will be preprocessed and given it to the saved model to predict the facemask.
 |
| Figure 3. Realtime Facemask Model testing |
Code:-
#Importing Libraries
import cv2
import matplotlib.pyplot as plt
import numpy as np
import winsound
#Importing Preprocessing and model Libraries
from keras.models import load_model
from keras.preprocessing import image
#Importing model
model = load_model('FaceMask_Acc91.h5')
cap = cv2.VideoCapture(0)
#Importing haarcascade from Directory
faceCascade = cv2.CascadeClassifier('haarcascade_frontalface_default.xml')
while 1:
#Frame reading
ret,frame = cap.read()
#Applying FaceDetection Haarcascade on frame
faceDet = faceCascade.detectMultiScale(frame,1.2,5)
for x,y,w,h in faceDet:
#Drawing Rectangle on Face
cv2.rectangle(frame,(x,y),(x+w,y+h),(0,255,0),3)
#taking area of face in frame and preprocess it
img = frame[y:y+h,x:x+w]
img = cv2.resize(img,(256,256))
img = image.img_to_array(img)
img = np.expand_dims(img,axis=0)
img = img/255
#prediction on preprocess image
result = model.predict_classes(img)[0]
#Conditions for Face mask Detection as per previous code
if result == 1:
cv2.putText(frame,'Face Mask Detected',(20,20),cv2.FONT_HERSHEY_SIMPLEX,0.5,(0,255,0),1)
if result == 0:
cv2.putText(frame,'Face Mask not detected',(20,20),cv2.FONT_HERSHEY_SIMPLEX,0.5,(0,0,255),1)
winsound.Beep(1000, 100)
#FaceMask window Showing
cv2.imshow('FaceMask Window',frame)
#Press Esc to exit window and Destroy all Windows
if cv2.waitKey(1) & 0xFF == 27:
break
cap.release()
cv2.destroyAllWindows()
Output Video:-
This work is licensed under a Creative Commons Attribution-NoDerivatives 4.0 International License.


Comments
Post a Comment